|
Machined Wheel Preparation
Before you get any farther, read your wheel rules! The
following section describes techniques which are guaranteed to
be illegal in many Packs and Districts and will get your
son's car disqualified if you use them.
Ok, you've been warned. Now, what is the big deal with machining
wheels? The primary purpose is to minimize the rotating mass.
The rules say you can't reduce the diameter of the wheels. Ok,
that's fine. We will remove material from the inside
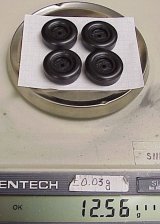
of the tread and sidewall areas, instead. Look at the two photos
below. The "before" shows the mass of a set of stock wheels as
a bit over 12.5 grams. The "after" wheels weigh in at just under
half that.
So why does the mass of the wheels matter? After all, I told
you we will bring the total mass of the car right back to 5.000
ounces before we're done, right? A physicist would mumble something
about "rotational moment of inertia". In simple terms, it takes
energy to "spin up" the wheels as the car starts. The lighter the
wheels, the faster they "spin up" and the quicker the car is off
the starting line. The difference is dramatic. Although I haven't
quantified it, an otherwise identical car with lightened wheels
seems to "jump" off the line and gets a visible head start in the
first couple of feet of the sloping part of the track.
What is the general plan? The tread of the stock wheels starts out at
about 0.090" thick. We will reduce that to 0.035". The sidewalls
are molded at about 0.109" thick and we'll take that down to 0.035"
as well. That pulls half the mass out of the wheel, and mostly from
around the perimeter where it matters most from the physicist's
viewpoint. (The farther out from the center the mass is, the more
energy it takes to spin it up.)
Tools and supplies for machining and preparing wheels:
-
Safety goggles
-
Precision metalworking lathe
-
Set of gauge pins
-
Collet sized to grip the O.D. of the wheel
-
Sharp pointed lathe cutter
-
Custom inside-cutting tool
-
Plunger-type dial indicator mounted on vertical
holder, with narrow plunger tip
-
Numeric-controlled milling machine programmed
to cut a "bolt pattern" of eight holes
-
Chiller (at work, we have what is called a "vortex
tube" that takes shop air and by a vortex action,
spits out chilled air at the other end) I suppose
you could also use a stream of cutting fluid, but
the lathes at work aren't set up with fluid, so
we use air instead.
-
All of the supplies from the "simple wheel preparation
section", except the 220-grit sandpaper
Process for machining wheels
-
Select a gauge pin which is a light press fit into the
axle hole of the wheels (You may find that you have
to go up or down 0.001" or 0.002" from wheel to
wheel because of cavity-to-cavity variability in
the wheels.) It is a very good idea to
practice this process on a couple of scrap wheels before
starting on your "good" wheels selected for smooth
running!
-
Chuck the gauge pin in the lathe and press the wheel onto
the pin, with the hub (inside) end out away from the chuck.
-
Spin the wheel and bring the pointed tool down to kiss the
O.D. of the tread.
-
Taking very light cuts (no more than 0.0015" per cut),
turn the O.D. just enough to smooth the tread. This will
typically be about 0.007" to 0.010" total removed. You
must not appreciably reduce the diameter. The basic rule
is not to do more than the "simple wheel preparation" does
with sandpaper. Set the diameter zero on the lathe and cut
all of your wheels exactly the same amount.
-
Now pick up the "simple wheel preparation" at the point of
using the 400-grit wet/dry sandpaper, through polishing the
O.D. of the tread.
-
Complete these steps on all of your wheels. Be sure to make
a few extras in case you wreck any in mid-process!
-
Replace the small chuck with the collet sized to hold the
O.D. of the wheels.
-
Set the custom tool up to plunge into the wheel end-on
-
Chuck a wheel in the collet with the open (inside) side
facing out.
-
Set up the chiller to blast cold air on the tool/wheel
interface. If you don't, the friction will melt the wheel
to a glob of useless goo.
-
Position the tool to just start cutting and then start taking
small amounts off the inside of the tread until you reduce
its thickness to the desired 0.035". Set the diameter
indicator on the lathe's numeric indicator to zero at this
point.
-
Now start plunging down into the sidewall until you reach
that same 0.035" remaining thickness. This requires pulling
the tool out, taking the wheel out and measuring it with
the plunger-type dial indicator, and once you get to the
right thickness, setting the zero on the numeric indicator
on the lathe.
-
You now have the lathe "zeroed" at your desired thickness
for both tread and sidewall. Chuck up another scrap wheel
and verify that you still get the right thicknesses before
cutting "real" wheels.
-
Now cut your good wheels, being careful to take light cuts,
back the tool off to break the gummy chip which develops,
and cut slowly and smoothly down to the zero point you set.
|